The Agile System Development Life Cycle (SDLC)
I'm often asked to over viewing the ideas presented in the Agile Manifesto and agile techniques such as Test-Driven Design (TDD), database re factoring, and agile change management. One issue that many people seem to struggle with is how all of these ideas fit together, and invariably I found myself sketching one or more pictures which overview the life cycle for agile software development projects. I typically need one or more pictures because the scope of life cycles change -- some life cycles address just the construction life cycle, some address the full development life cycle, and some even address the full IT life cycle. Depending on your scope, and how disciplined your approach to agile software development is, you will get different life cycle diagrams.
This article covers:
# 1: The scope of life cycles
# 2: Iteration -1: Pre-project planning
# 3: Iteration 0: Project inception
# 4: Construction iterations
# 5: Release iterations
# 6: Production
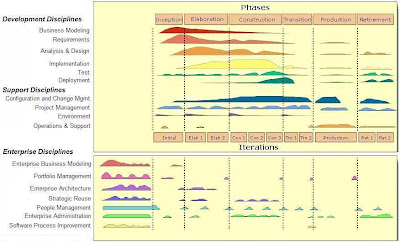
# 7: Retirement1. The Scope of Life Cycles:In Enterprise Unified Process (EUP) the scope of life cycles can vary dramatically. For example, Figure 1 depicts the Scrum construction life cycle whereas Figure 2 depicts an extended version of that diagram which covers the full system development life cycle (SDLC) and Figure 3 extends that further by addressing enterprise-level disciplines via the EUP life cycle. The points that I'm trying to make are:- System development is complicated: Although it's comforting to think that development is as simple as Figure 1 makes it out to be, the fact is that we know that it's not. If you adopt a development process that doesn't actually address the full development cycle then you've adopted little more than consultant ware in the end. My experience is that you need to go beyond the construction life cycle of Figure 1 to the full SDLC of Figure 2 (ok, Retirement may not be all that critical) if you're to be successful
- There's more to IT than development: To be successful at IT you must take a multi-system, multi-life cycle stage view as depicted in Figure 3. The reality is that organizations have many potential projects in the planning stage (which I'll call Iteration -1 in this article), many in development, and many in production.
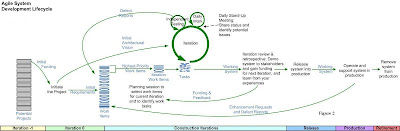
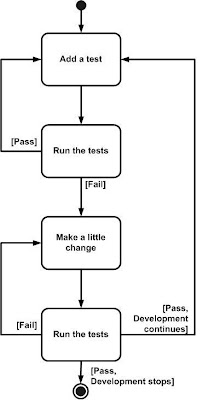
Figure 1 uses the terminology of the Scrum methodology. The rest of this article uses the terminology popularized in the mid-1990s by the Unified Process (Sprint = Iteration, Backlog = Stack, Daily Scrum Meeting = Daily Meeting). Figure 1 shows how agilists treat requirements like a prioritized stack, pulling just enough work off the stack for the current iteration (in Scrum iterations/sprints are often 30-days long, although this can vary). At the end of the iteration the system is demoed to the stakeholders to verify that the work that the team promised to do at the beginning of the iteration was in fact accomplished.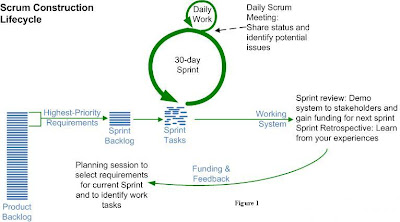
 |
| Figure 2 |
 |
| Figure 3 |
 |
| Figure 4 |
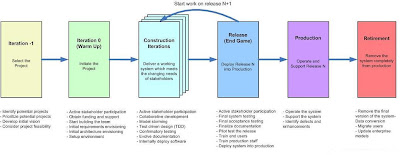
On the surface, the agile SDLC of Figure 4 looks very much like a traditional SDLC, but when you dive deeper you quickly discover that this isn't the case. This is particularly true when you consider the detailed view of Figure 2. Because the agile SDLC is highly collaborative, iterative, and incremental the roles which people take are much more robust than on traditional projects. In the traditional world a business analyst created a requirements model that is handed off to an architect who creates design models that are handed off to a coder who writes programs which are handed off to a tester and so on. On an agile project, developers work closely with their stakeholders to understand their needs, they pair together to implement and test their solution, and the solution is shown to the stakeholder for quick feedback. Instead of specialists handing artifacts to one another, and thereby injecting defects at every step along the way, agile developers are generalizing specialists with full life cycle skills.2. Iteration-1: Pre-Project PlanningIteration -1, the “pre-Inception phase” in the Enterprise Unified Process (EUP), is the pre-project aspects of portfolio management. During this phase you will:- Define the business opportunity: You must consider the bigger business picture and focus on market concerns. This includes exploring how the new functionality will improve your organization’s presence in the market, how it will impact profitability, and how it will impact the people within your organization. This exploration effort should be brief, not all projects will make the initial cut so you only want to invest enough effort at this point to get a good “gut feel” for the business potential. A good strategy is to follow Outside-In Development’s focus on identifying the potential stakeholders and their goals, key information to help identify the scope of the effort.
- Identify a viable for the project: There are several issues to consider when identifying a potential strategy for the project. For example, do you build a new system or buy an existing package and modify it? If you decide to build, do you do so onshore or offshore? Will the work be solely done by your own development team, by a team from a system integrator (SI), or in partnership with the SI? What development paradigm – traditional/waterfall, iterative, or agile – will you follow? Will the team be co-located, near-located within the same geographic region, or far-located around the world? As you can see there are many combination of strategy available to you, and at this point in time you may only be able to narrow the range of the possibilities but be forced to leave the final decision to the project team in future iterations.
- Assess the feasibility: During Iteration -1 you will want to do just enough feasibility analysis to determine if it makes sense to invest in the potential project. Depending on the situation you may choose to invest very little effort in considering feasibility, for many systems just considering these issues for a few minutes is sufficient for now, and for some systems you may choose to invest days if not weeks exploring feasibility. Many organizations choose to do just a little bit of feasibility analysis during Iteration -1, and then if they decide to fund the project they will invest more effort during Iteration 0. In my experience you need to consider four issues when exploring feasibility: economic feasibility, technical feasibility, operational feasibility, and political feasibility. Your feasibility analysis efforts should also produce a list of potential risks and criteria against which to make go/no-go decisions at key milestone points during your project. Remember that agile teams only have a success rate of 72%, compared to 63% for traditional projects, implying that almost 30% of agile projects are considered failures. Therefore you should question the feasibility of the project throughout the life cycle to reduce overall project risk.
Iteration -1 activities can and should be as agile as you can possibly make it – you should collaborate with stakeholders who are knowledgeable enough and motivated enough to consider this potential project and invest in just enough effort to decide whether to consider funding the effort further. 3. Iteration 0/Warm up: Project InitiationThe first week or so of an agile project is often referred to as “Iteration 0” (or "Cycle 0") or in The Eclipse Way the "Warm Up" iteration. Your goal during this period is to initiate the project by:- Garnering initial support and funding for the project: This may have been already achieved via your portfolio management efforts, but realistically at some point somebody is going to ask what are we going to get, how much is it going to cost, and how long is it going to take. You need to be able to provide reasonable, although potentially evolving, answers to these questions if you're going to get permission to work on the project. You may need to justify your project via a feasibility study.
- Actively working with stakeholders to initially model the scope of the system: As you see in Figure 5, during Iteration 0 agilists will do some initial requirements modeling with their stakeholders to identify the initial, albeit high-level, requirements for the system. To promote active stakeholder participation you should use inclusive tools, such as index cards and white boards to do this modeling – our goal is to understand the problem and solution domain, not to create mounds of documentation. The details of these requirements are modeled on a just in time (JIT) basis in model storming sessions during the development cycles.
- Starting to build the team: Although your team will evolve over time, at the beginning of a development project you will need to start identifying key team members and start bringing them onto the team. At this point you will want to have at least one or two senior developers, the project coach/manager, and one or more stakeholder representatives.
- Modeling an initial architecture for the system: Early in the project you need to have at least a general idea of how you're going to build the system. Is it a mainframe COBOL application? A .Net application? J2EE? Something else? As you see in Figure 5, the developers on the project will get together in a room, often around a whiteboard, discuss and then sketch out a potential architecture for the system. This architecture will likely evolve over time, it will not be very detailed yet (it just needs to be good enough for now), and very little documentation (if any) needs to be written. The goal is to identify an architectural strategy, not write mounds of documentation. You will work through the design details later during development cycles in model storming sessions and via TDD.
- Setting up the environment: You need workstations, development tools, a work area, .. for the team. You don't need access to all of these resources right away, although at the start of the project you will need most of them.
- Estimating the project: You'll need to put together an initial estimate for your agile project based on the initial requirements, the initial architecture, and the skills of your team. This estimate will evolve throughout the project.
 |
| Figure 5 |
4. Construction Iteration:During construction iterations agilists incrementally deliver high-quality working software which meets the changing needs of our stakeholders, as over viewed in Figure 6. |
| Figure 6 |
We achieve this by:
- Collaborating closely with both our stakeholders and with other developers: We do this to reduce risk through tightening the feedback cycle and by improving communication via closer collaboration.
- Implementing functionality in priority order: We allow our stakeholders to change the requirements to meet their exact needs as they see fit. The stakeholders are given complete control over the scope, budget, and schedule – they get what they want and spend as much as they want for as long as they’re willing to do so.
- Analyzing and designing: We analyze individual requirements by model storming on a just-in-time (JIT) basis for a few minutes before spending several hours or days implementing the requirement. Guided by our architecture models, often hand-sketched diagrams, we take a highly-collaborative, test-driven design (TDD) approach to development (see Figure 7) where we iteratively write a test and then write just enough production code to fulfill that test. Sometimes, particularly for complex requirements or for design issues requiring significant forethought, we will model just a bit ahead to ensure that the developers don't need to wait for information.
- Ensuring quality: Agilists are firm believers in following guidance such as coding conventions and modeling style guidelines. Furthermore, we refactor our application code and/or our database schema as required to ensure that we have the best design possible.
- Regularly delivering working software: At the end of each development cycle/iteration you should have a partial, working system to show people. Better yet, you should be able to deploy this software into a pre-production testing/QA sandbox for system integration testing. The sooner, and more often, you can do such testing the better. See Agile Testing and Quality Strategies: Discipline Over Rhetoric for more thoughts.
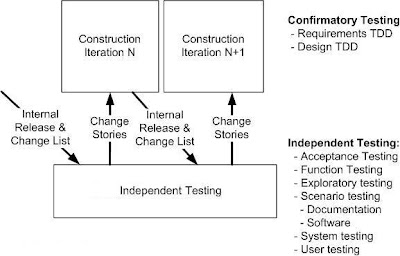
- Testing, testing, and yes, testing: As you can see in Figure 8 agilists do a significant amount of testing throughout construction. As part of construction we do confirmatory testing, a combination of developer testing at the design level and agile acceptance testing at the requirements level. In many ways confirmatory testing is the agile equivalent of "testing against the specification" because it confirms that the software which we've built to date works according to the intent of our stakeholders as we understand it today. This isn't the complete testing picture: Because we are producing working software on a regular basis, at least at the end of each iteration although ideally more often, we're in a position to deliver that working software to an independent test team for investigative testing. Investigative testing is done by test professionals who are good at finding defects which the developers have missed. These defects might pertain to usability or integration problems, sometimes they pertain to requirements which we missed or simply haven't implemented yet, and sometimes they pertain to things we simply didn't think to test for.
 |
| Figure 7: Taking "test first" approach to construction |
 |
| Figure 8: Testing during Construction Iteration |
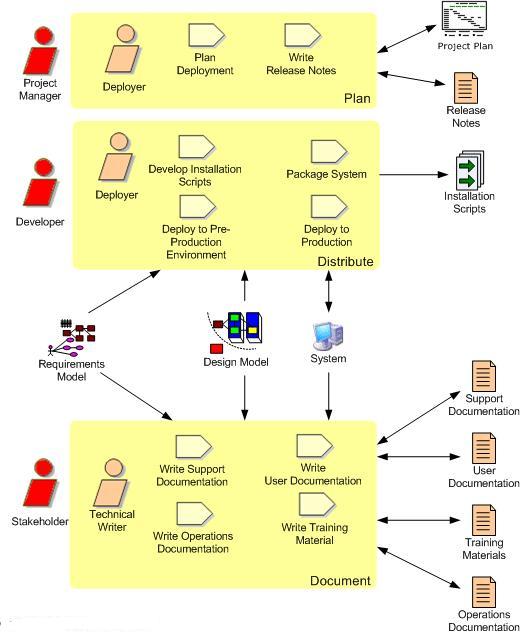
5. Release Iteration(s): The "End Game"During the release iteration(s), also known as the "end game", we transition the system into production. Not that for complex systems the end game may prove to be several iterations, although if you've done system and user testing during construction iterations (as indicated by Figure 6) this likely won't be the case. As you can see in Figure 9, there are several important aspects to this effort:- Final testing of the system: Final system and acceptance testing should be performed at this point, although as I pointed out earlier the majority of testing should be done during construction iterations. You may choose to pilot/beta test your system with a subset of the eventual end users. Check Full Life Cycle Object-Oriented Testing (FLOOT) method for more thoughts on testing.
- Rework: There is no value testing the system if you don't plan to act on the defects that you find. You may not address all defects, but you should expect to fix some of them.
- Finalization of any system and user documentation: Some documentation may have been written during construction iterations, but it typically isn't finalized until the system release itself has been finalized to avoid unnecessary rework Note that documentation is treated like any other requirement: it should be costed, prioritized, and created only if stakeholders are willing to invest in it. Agilists believe that if stakeholders are smart enough to earn the money then they must also be smart enough to spend it appropriately.
- Training.
- Deploy the system
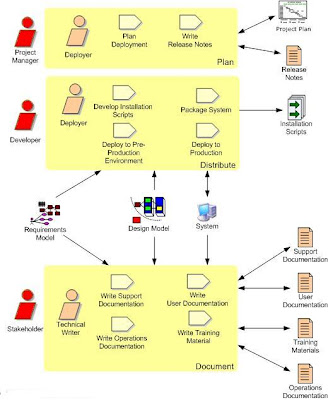 |
| Figure 9: The AUP Deployment discipline Workflow |
6. Production:The goal of the Production Phase is to keep systems useful and productive after they have been deployed to the user community. This process will differ from organization to organization and perhaps even from system to system, but the fundamental goal remains the same: keep the system running and help users to use it. Shrink-wrapped software, for example, will not require operational support but will typically require a help desk to assist users. Organizations that implement systems for internal use will usually require an operational staff to run and monitor systems.This phase ends when the release of a system has been slated for retirement or when support for that release has ended. The latter may occur immediately upon the release of a newer version, some time after the release of a newer version, or simply on a date that the business has decided to end support. This phase typically has one iteration because it applies to the operational lifetime of a single release of your software. There may be multiple iterations, however, if you defined multiple levels of support that your software will have over time.7. Retirement:The goal of the Retirement Phase is the removal of a system release from production, and occasionally even the complete system itself, an activity also known as system decommissioning or system sun setting. Retirement of systems is a serious issue faced by many organizations today as legacy systems are removed and replaced by new systems. You must strive to complete this effort with minimal impact to business operations. If you have tried this in the past, you know how complex it can be to execute successfully. System releases are removed from production for several reasons, including:- The system is being complete replaced: It is not uncommon to see homegrown systems for human resource functions being replaced by COTS systems such as SAP or Oracle Financial s.
- The release is no longer to be supported: Sometimes organizations will have several releases in production at the same time, and over time older releases are dropped.
- The system no longer needed to support the current business model: A organization may explore a new business area by developing new systems only to discover that it is not cost effective.
- The system is redundant: Organizations that grow by mergers and/or acquisitions often end up with redundant systems as they consolidate their operations.
- The system has become obsolete.
In most cases, the retirement of older releases is a handled during the deployment of a newer version of the system and is a relatively simple exercise. Typically, the deployment of the new release includes steps to remove the previous release. There are times, however, when you do not retire a release simply because you deploy a newer version. This may happen if you can not require users to migrate to the new release or if you must maintain an older system for backward compatibility.