- Remove unused Oracle Service from Windows: SC DELETE <Service_Name> // example: [SC delete OracleXEClrAgent]
- Edit - Windows Advance Environment Variable: $ control sysdm.cpl (when windows not letting us open through GUI interface)
- Depending on your environment download software from Oracle Site to your archive directory, I use "C:\CCC\BPM" and extract them appropriately following below steps.
- Install Database: C:/Oracle/11GR2
- Download Oracle Express 11GR2 Unzip the download and run the DISK1/setup.exe.
- C:\CCC\Downloads\OracleXE112_Win32\DISK1>setup.exe


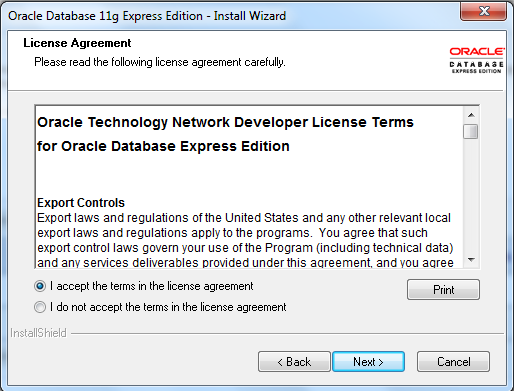

- Provide password as "Pa$$w0rd123" for SYS /SYSTEM user for XE Database.


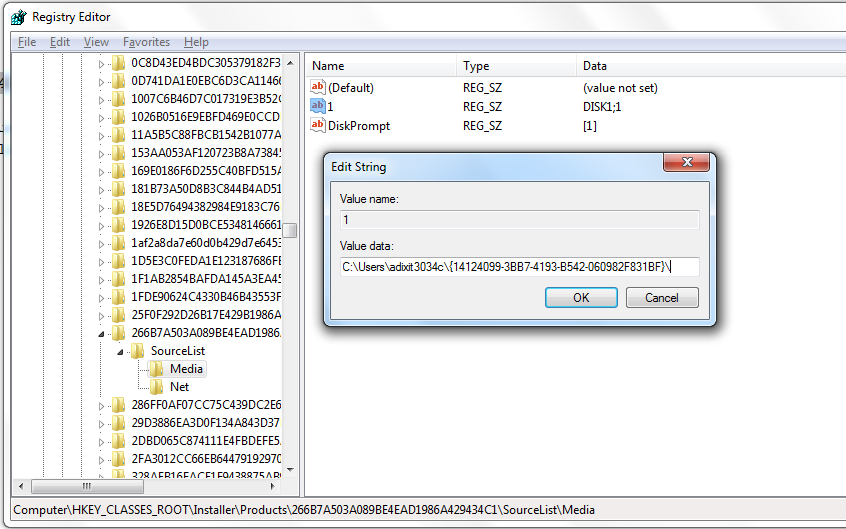
- Wait for Registry Editor Exception pop up from database installation, workaround is to Open Registry Editor : > Run > regedit.
- You need to locate this folder : HKEY_CLASSES_ROOT → Installer → Products → 266B7A503.... → SourceList → Media
- Update Edit Setting for 1 value as "C:\Users\adixit3034c\{14124099-3BB7-4193-B542-060982F831BF}\KEY_XE.reg".
- Save changes and complete installation.

- Oracle XE 11.2 Win 32 : note this is only good for Windows * 32 bit system.
- Once you are done with Installation of Oracle XE, you must update database parameters. Set the processes parameter to >=500 using the following instructions.
- CONN[ECT] [{logon | / | proxy} [AS {SYSOPER | SYSDBA}]] where
- logon has the syntax: username[/password] [@connect_identifier]
- proxy has the syntax: proxy user[username] [/password] [@connect_identifier]
- Login to sqlplus & run following commands(SQLPLUS SYS AS SYSDBA)
- SQL> show parameter session
- SQL> show parameter processes
- SQL> alter system reset sessions scope=spfile sid='*';
- SQL> alter system set processes=500 scope=spfile;
- SQL> shutdown immediate
- SQL> startup
- SQL> show parameter session
- SQL>show parameter processes
- Oracle 11G R2 Database - Win 64:
- If Screen disappear after selecting Desktop class as system class, you have following 2 options:
- setup -jreLoc C:\YYY\java\jdk1.6.0_45
- if above one does not work then while installing DB select only install database only and then create a database :)

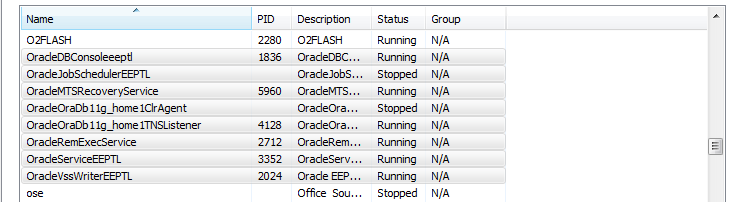
- To start / stop oracle database in windows: start / stop following services ['Control Panel' > 'Administrative Tools' > 'Services'] or can use command $ net start <Service_Name>
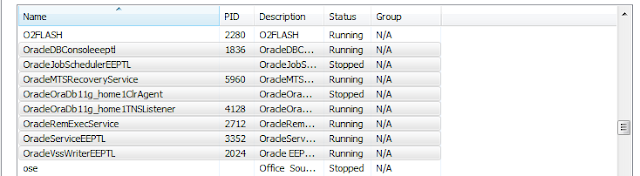
- Use command ($ lsnrctl status) to check status.
- Schema Configuration: RCU
- Unzip and navigate to RCUHome/bin and open a command window and run rcu.bat.
- Note: If you want to use Oracle XE as your database, you need to set the RCU_JDBC_TRIM_BLOCKS environment variable to true*prior* to running RCU.
- The BAT file return to command prompt immediately and after a few seconds 'Repository Creation Utility Opens' ( if you just ran the utility to drop the schema , it open second time comparatively quickly)
- Fill the fields according to your environment:
- Database type: Oracle
- Host Name: LocalHost
- Port: 1521
- Service Name: XE
- Username: SYS
- Password: Pa$$w0rd
- Role: SYSDBA

- Select Components from RCU that you want to install, we will target MDS for metadata and all SOA/ BPM Components.

- When prompted i give same password for all Schema and move next.

- Click Next.

- Click on create to create tablespace, this takes around 2 mins and after completion will display summary page as below:

- Close the Window, this step created Schema required for Metadata & SOA / BPM.
- Weblogic Installation: C:/Oracle/Middleware (WLS1036_Generic.jar * 64 bit)
- Installing SOA BPM Suite:
- Once the database is configured, and WebLogic is installed now you can now install the SOA server into the Oracle Home on the WebLogic server. Extract ofm_soa_generic_11.1.1.7.0_disk1_1of2.zip, ofm_soa_generic_11.1.1.7.0_disk1_2of2.zip at C:\Pradeep\OracleDownloads (this can be any path where you want to extract these zip files)
- execute: setup.exe -jreLoc C:\YYY\java\jdk1.6.0_45
- Wait for installation to finish, it will take a few minutes, in the end click on Finish.
- Install JDeveloper: C:/Oracle/JDev
- Once installation is complete open Jdeveloper and follow below steps:
- Select > Help > Check for updates, click on Next.
- Select search update centers and select oracle fusion middleware products.
- Click on next. The system will search the update center for extensions.
- Select all SOA and BPM Updates.
- Restart the JDeveloper.
- Domain Creation:
- This step describes detail for configuring the weblogic server domain for the SOA Server.
- In the command window enter: $ MiddlewareHome/Oracle_SOA1/common/bin/config.sh

- Name Domain Name (base_domain):

- domain username and password: weblogic / weblogic123

- Update schema credentials: in our case all schema have same passwords:

- Select Admin Server and fill Admin server details and click next.


- When the configuration wizard's welcome screen comes up, select create a new weblogic domain and then click on next.
- Memory Setting: (Important otherwise domain won't come up):
- Update: C:\Oracle\Middleware\user_projects\domains\base_domain\bin\setSOADomainEnv.cmd
- [set DEFAULT_MEM_ARGS=-Xms512m –Xmx718m]


%%%%%%%%%%%%%%%%%%%%%%%%%%%%%%%%%%%%%%%%%%%
Completed SOA & BPM Installation
Completed SOA & BPM Installation