Step 1: Introduction
This is simply an intro. If you want to save time, skip reading here, and go directly to part 2. There is no vital technical information here.
I've been looking for at small, cheap computer to play the role as a flexible, small (and smart) TTY/SSH client for a while. I was looking for a used 10.1” mini-PC, expecting to install OpenSUSE / CentOS on it. Suddenly, I stumbled over a dirt cheap, brand new, 64bit 17” computer, Windows 8 preinstalled – the works!
It was an HP DV6 Pavillion. Learn W8, the computer, install and adapt SW – and investigating how to keep Win8 while dual-booting into CentOS 6.X, OpenSUSE 12.3. After all, this was all new to me: W8, OpenSUSE 12.3, CENT OS, UBUNTU, UEFI, Secure Boot, GPT.
While investigating this, I found that many others were wondering about the same, and I did not find one posting that answered all my questions. So I decided to publish my findings when I had something to report. It seems to have some kind of “magic” connected to it to get things working, and that the results may be unreliable.
I set out to assemble knowledge in order to sort it all out, and to find a way to do it reliably. What is below is the results of my findings. I've tried to make it systematic and easy to read, yet complete. Where I think it isn't complete, I've said so. If you think I've missed something, please say so. There isn't much that is my own thoughts – most of it has been derived by piecing together information found elsewhere on the Internet.
My impression and bold standing on this issue, is that as of now, dual-booting a preinstalled Windows 8 through UEFI Secure Boot is working, and behaves predictable - provided you do the right things, and that you do it right (isn't it always so?). The “only” unknown factor remaining, it seems, is what is being introduced by the firmware vendors – and that is inevitably going to improve as time goes by as well. So – if you've got a fairly new BIOS (which you probably do have, since you have Windows 8 preinstalled), the chances are that you will be fine.
I'll split everything into what I believe are logical parts to make it easy to look up what you need. Except for the troubleshooting part, which you hopefully will not need (I didn't – at least up to now), you'll need to broadly follow the sequence I've listed, though – at least on the “installment” level.
As you will see, I am not fully satisfied with my findings yet, as I want more tools and procedures to aid in the case of problems, although I did not run into any problems when doing as described below. However, please do supply any info you have to add, and be sure to complement, complete or correct any errors of mine. I will continue to investigate the troubleshooting part for some time – and update this thread when/if I find something. If I don't, I'll wait for some more time to go by – then return and update when something interesting has arrived. However, it is inevitable that the relevance of this thread will lessen as the UEFI/Dual-boot scenario matures and better support is offered from everywhere. My bet is that with the next release of OpenSUSE, most (all?) new PCs shipping will be reliable as far as UEFI/DualBoot goes.
Step 2: Getting to know the terminology (BUZZ Words):
First of all: Here are some links I found useful and that can be looked up by those who want more details. You'll find that many of these links point to each other, as they can be seen as references in its own right:
- OpenSUSE: OpenSUSE's own UEFI de-mystifier, simple and technically advanced at the same time. Truly a good starting point for further study.
- Booting from GPT: Rod Smith's excellent site about everything UEFI/GPT. This link enters somewhere "in the middle" of his site, but holds links to the other parts as well. Truly useful. His tool GPTFdisk (gdisk) is part of the OpenSUSE 12.3 distribution.
- EFI System partition: About ESP on Wikipedia.
- GRUB/GRUB2:
- GUID Partition Table:
Some links from the Microsoft site. Since W8 may disturb dualbooting in its own favour, one can be helped by fixing things from the W8 side. Most of these evolve around Microsoft's BCDEdit.exe, which is a tool that seems to be able to handle almost everything in the UEFI partition, but is terribly documented. "Terribly" in this case means it seems to be documented, but it is so scattered and cluttered, that it really takes time and effort to put it all together – and to get a clear overview of what the terms Microsoft is using really means in practical life. I haven't done that yet, and it will have to wait until I run into a problem I can't resolve in any other way, I am assigned a task that makes that sensible, or a rainy day when I lack other things to do.
GPT is short for GUID (or UUID) PT which is short for Globally Unique ID Partition Table. This is replacing the old MBR (Master Boot Record) partitioning scheme which we are all accustomed to. This is inevitable due to the limitations of MBR. In practice and for the short term/immediate concequences, the most visible change is that GPT's partitions are what is known in MBR as primary partitions, and that there can be (many) more than 4. (In fact, 128 partitions for a start – you can extend that). I.e my Asus S200E came with 6 primary partitions. The ESP partition is one of these, but this partition is not required on a GPT partitioned disk. On Windows GPT prepared disks, you will also find a small (mostly 128MB in size) MSR (=Microsoft Reserved) partition. As with MBR, only one GPT partition can be the System partition (the one that control is transferred to during the boot-process). In an UEFI-based system, this must be the ESP partition you want to control the proceedings.
What is UEFI?
What is the MSR partition?
MSR (Microsoft Reserved partition) is a Microsoft specific, small, hidden (from within the OSes, but GPT does not allow for hidden partitions in the way MBR did), unformatted partition Microsoft require to be present on all its GPT partitioned disks. The size is 32MB for disk sizes below 16GB, 128MB for the bigger disks. Provided I haven't misunderstood MS, MS (and probably also third-party SW components with the right requirement) will "erode" this partition into more partitions; i.e. if you repartition your drive in certain ways ("Dynamic disks"), thus adding more partitions to your drive. For the time being, there is a limited number of partitioners that can handle this partition. gdisk (included in OpenSUSE 12.3) is one, and Microsoft's DiskPart.exe is an obvious alternative. Beware though, both of these have a different user interface from fdisk, so there is some "getting used to" involved. PartEd Magic's live CD (2013-05-01 edition) will display and delete the MSR partition, but nothing else. So, if you want GPT partitioning and want to access these from both Windows and Linux, be sure to create an MSR partition as well when you first partition it.
See Microsoft's GPT FAQ (see link above) if you want more details.
What is the ESP partition?
In an UEFI system, ESP (=EFI System Partition) is the partition that holds the boot-loaders that in turn loads the OS you want. The UEFI specification does not limit the number of ESP partitions on a disk, nor does it put restrictions on their positions, but only one can be marked System in the GPT at one time. The one marked System, will be the one controlling the boot process. The ESP partitions are FAT formatted (Windows 7 needs FAT32, my Windows 8 preinstallation file set also came with FAT32 formatted ESP partition for Windows 8 – I haven't tried changing that).
The ESP partition: How many are needed, where, and how big should it be?
Different sources on the internet says different things. Microsft only support one such partition – and that partition needs to be on your boot disk. MS also recommends it to be the first partition on your disk. As for size, according to Rod Smith (see link above) Windows installers create 100MB ESP partitions, Macs create 200MB, while Linux utilities gets confused with FAT16/32 setups if partitions are smaller than 520MiB, so he recommends creating 550MiB for the ESP. My system came with a 300MB ESP partition.
A comment of mine on the 128 possible GPT partitions:
As this lifts the pressure from the 4 MBR partitions we have been struggling with for years, I look forward to see how this evolves. The immediate effect is obvious. However, resources available will be used, and I expect to see new and innovative ways of exploiting the now "endless" resource that the number of partitions is. Just see how fast we passed the 16MB limit of the IBM PCAT when we at last passed the 640KB memory limit of Intel Real Mode in IBM PCs. Microsoft's way of using the MSR-partition gives us some pointers: We can expect to see many small partitions for special use. Maybe 128 partitions will end up to be a hurdle after all? No problem – we can just expand that, 128 partitions isn't a limitation of the specification. Doing so, however, does include repartitioning of your disk – and Microsoft says "Windows implementation restricts this to 128 partitions" (see GPT FAQ in link above). So – in a dual-booting Windows/Linux system, 128 partitions may become a serious limitation sooner than we think – simply because nobody sees it as a problem the way 4 MBR partitions (almost) always were, and start creating partitions at a rate we've never seen before.
The BIOS/UEFI Firmware problem:
This is the one problem you and I cannot do much about apart from making the right choice when purchasing the PC. We are stuck with what the vendor provides. My reading on the 'net indicate that there still are some differences here and there, and that some of them will not do in a dual boot Windows 8/Linux setup.
However, a computer that comes with Windows 8 factory installed, is certified (by Microsoft) to conform with UEFI-standards and secure boot. That should help. Also, OpenSUSE 12.3 64-bit edition do support UEFI-booting, secure-boot incuded.
Make sure, however, that you do upgrade your BIOS to the latest one published – even if you have a brand-new PC! Upgrading (anything) prior to properly starting to use it, has helped me many times over the years. By doing that, I have avoided many problems others have been banging their heads into.
In my case, the computer I bought Tuesday last week, seems to be manufactured in December 2012 (if I read the labels correctly). The latest BIOS (version 202) published, was dated October 26th 2012. I was surprised to see that my BIOS was version 203! As I am writing this, I see that more have happended on Asus' support site: In the period of the last few days, they have been publishing several newer version of my BIOS, the latest one is dated yesterday – version 209. I still have work to do ...
The bottom line is: If you purchase a PC that comes with Windows 8 factory installed, chances are good that your BIOS is up to the task of dualbooting into Linux. Other HW drivers however, is the same game as it has always been.
Secure boot: What is it, do I need it and what exactly does it provide?
Non-technically spoken, and a little inaccurate, this is a way to make sure that no one can modify the files involved in loading an OS without it being detected. If such modification is detected, booting will be interrupted. Such a mechanism makes it more difficult to sneak in viruses, root-kits etc. However, if you do run into problems (or you for some reason don't want it), you can disable secure booting. That will enable booting without the modification-checks, and the OS will be loaded. To do its job, secure-boot involves X509 certificates, encryption and digital signatures, and protects OS-files until the kernel has been read and loaded. This is equal for Windows and OpenSUSE 12.3. If you want more details, see OpenSUSE's UEFI demystifier link and the link to Rod Smith's site above.
Getting to know Windows 8:
I know, this is a Linux site, but bear with me. What is listed here isn't much, and it makes for some shorter text elsewhere in this thread – and it is tidy to keep it in a collection. <Wkey> means the Windows-key present on all Windows PC-style keyboards:<Wkey>-X. If you are like me, this menu will soon be your favourite Windows 8 menu
- <Wkey>-Q All applications - "The Metro UI"
- <Wkey>-I Settings shortcut + power off and some more.
- <Wkey>-C Same as moving mouse-pointer to upper right corner of the screen.
- <Wkey>-E Start Windows explorer (File Manager).
- <Wkey>-D Access the Desktop, as close to the old-fashioned desktop style as you gets in W8 for now (without 3rd-party tools).
- <Wkey> Toggle between the Metro GUI's Start screen and Windows 8 Desktop.
- <Alt>-F4 still works as you would expect
- <Alt>-<Tab> (and <Alt>-<Shift>-<Tab>) also work as you expect.
Windows 8.1 is rumored to give you back the Start button...
Step 3: Decisions
Based on the info given in Part 2 above, I made my decisions about how to set up my computer: You should make similar decisions for yourself.
- Number of ESP partitions: Due to Microsoft's recommendations in its GPT FAQ (see link above), I am reluctant to have more than one ESP on a disk in a system that will coexist with Windows. However, due to other comments I've read (I am not able to find it back, sorry) making an ESP partition mandatory for any disk may come in handy for Linux type of systems (and Microsoft doesn't advice against it either) so I will put an ESP as the first partition (and an MSR partition as the second partition if it is to be used in combination with Windows) on any data disk i set up with GPT.
- The size of the ESP: In spite of Rod Smith's advice, I am going to keep my ESP partition at 300MB. If, however, I were to do partition my disk from the start using GPT, I probably would have followed his advise and set it to 550MiB.
- The other partitions: My system came with 6 partitions on its 320GB disk:
- 300MB EFI System Partition FAT32
- 900MB Recovery Partition NTFS (this is an OEM partition)
- 128MB MSR Partition Required. No data, not formatted.
- 119GB OS (my W8 drive C: NTFS)
- 157GB Data (my W8 drive D: NTFS)
- 20GB Recovery Partition NTFS
- I decided to simply delete partition 5 and 6, and make them available to OpenSUSE. I also tried to delete partition 2 (I could) and move partition 3 onto partition 1 (I couldn't – at least, I didn't find out how without much hazzle) so I kept partition 2 all the same. Not much space wasted anyway. (Don't remove any partitions of yours yet).
- For OpenSUSE, I decided for 4GiB + 128MB as swap size. As I read somewhere (I have yet to test it) that Linux uses the swap partition for hibernation, the swap partition needs to fit the amount of RAM + a little more. I have 4GB of RAM on my system, and 128MB is a little more.
- The remaining space I split equally between the root (/) and /home partitions, as I do not yet have a clear picture as of where I need space the most. But I sure want an easy upgrade path to the next release, so I wanted a proper /home partition to keep.
Step 4: Preparation
Preparing your computer for dual booting:
- You should do a full backup of your harddisk. I used CloneZilla live-CD and saved a full disk-copy onto an external USB-disk prior to booting any OS (Windows 8) the first time. Always download and use a new version of CloneZilla for a new PC. That's the best way to make sure that the technologies supported match the technologies needed. I had to switch off UEFI boot mode (launch CMS), and disable secure-boot to boot the CloneZilla live-CD. See below: “The steps I followed” to see what I did to go through it all.
- Visit your computer vendor's support-page and check that you have the latest version of BIOS installed. If you do not, upgrade your BIOS. Make sure that you are verifying the right edition of your BIOS, and that you do not pick the wrong one. My computer had two BIOS editions, each with its own set of versions. Asus was very clear about how to pick the right BIOS edition.
- Boot your PC into Windows 8 and let Windows install itself, if you have not already done so. Make adjustments to your liking.
Preparing Windows 8 for dual-booting:
- Do a complete upgrade of Windows 8 using Windows Update.
- Also, if your vendor publish any Windows-specific utilities for your PC, upgrade these too – particularly those being BIOS/HW-configuration oriented.
- Back up the EFS partition:
- <Wkey>-X --> "Command Prompt (Admin)". Confirm.
- Create (as you need) and go to a directory where you want to store the contents of the EFS partition.
- Enter the command: [$ bcdedit /export .\sysdefault.uefi] to save the contents of the EFS partition in the file sysdefault.uefi in the current directory. This may come in handy if a simple EFS adjustment is all that is needed later on...
- To keep Windows 8 from cluttering up the EFI NVRAM (and thereby hiding your soon-to-be important OS from you):
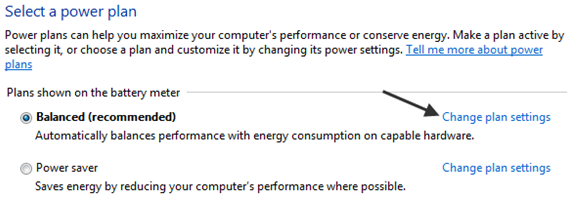
- <Wkey>-X --> Control Panel.
- Select category "All Control Panel Items"
- Select "Power Options"
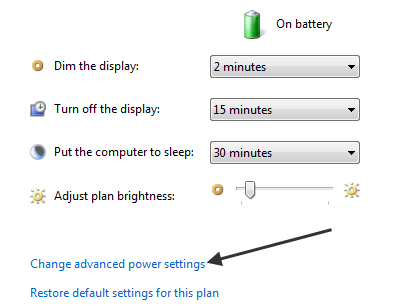
- Click "Choose what the power buttons do"
- Click "Change settings that are currently unavailable"
- Scroll down to unveil "Shutdown settings"
- Make sure that two of these values are unchecked, namely:
- "Turn on fast start-up (recommended)" and
- "Hibernate"
- Uncheck any or both of these as required.
- If you did a full Windows 8 backup under "Preparing your computer..." above, you can skip this, but having this one will make it easier to fix problems without having to reset your computer all the way back to factory settings. So, I recommend you to go on and create a Windows 8 recovery drive:
- <Wkey>-X --> Control Panel.
- Select category "All Control Panel Items"
- Select "Recovery"
- Choose "Create a recovery drive"
- This demands a USB drive (memory stick – Windows will reformat it!), on my system minimum 16GB USB drive was required, I've read someone quoting 32GB being required. I suppose that depends on what the OEM preinstalls. My 32 GB USB drive had 19GB free (of 29GB total capacity) after performing this action, which reflects the contents of partition 6 on my system.
- I was offered to delete the recovery partition to free up some drive space. I did. I was going to anyway (see above). This resulted in another drive being made available to Windows 8: Drive G: totalling 20GB of additional free disk space.
- Power off Windows 8
- <Wkey>-I --> Power --> "Shut down"
This concludes Windows 8 preparations, and Windows 8 should now be ready to cooperate properly in a dual-boot UEFI Secure boot setup.
Some more preparations:
I chose to use the PartEd Magic live-CD once again for this (remember to download the latest version if you do too), but if you feel confident in OpenSUSE's setup partitioner, you can do just the same as shown here from there. If you do not feel fluent in OpenSUSE's disk partitioner, I recommend you to do as I did, and describes here:
- Boot using PartEd Magic (latest version - I used the 2013-05-01 edition).
- To do that, I had to connect a USB DVD-reader to boot, and needed to switch to BIOS/MBR boot emulation and disable secure boot:
- On my PC, that meant power on while holding down F2 until the BIOS setup screen appeared. Your PC may have other demands, e.g. Del (used to be standard on Dell computers), F10, F12 or something else.
- From the BIOS top menu, I chose "Boot", then "Launch CSM" and changed that from "Disabled" to "Enabled", Then I selected "Security" in the BIOS top menu, then "Secure Boot Control" and changed that from "Enabled" to "Disabled".
- I then pressed F10 to save and exit.
- Upon the reboot that followed, I had to wake up the boot-source selection menu. On my computer, this is done by pressing and holding the Esc-key until the boot-menu is displayed. If PartEd Magic is the only non-GPT partitioned, bootable medium available, your BIOS may boot PartEd Magic directly.
- I selected my USB DVD-drive and waited for the Parted Magic menu to be displayed.
- Since this is a 64-bit computer, and I am not native English, I selected item "2+", and selected my language from the next screen (again, the "64" alternative).
- READ THIS ITEM TO THE END BEFORE YOU DO ANYTHING! Start up the disk partitioner from the desktop, and delete partitions you do not want. If no partitions are available for deletion (your Windows 8 C:-partition may span the disk from wherever-it-starts and to the end of the disk, resize it until you have ample disk space available for OpenSUSE.
- NOTE: On my PC, the Windows 8 C:-drive's partition is labeled "OS". You should make sure that you know which partition is which, and you should normally NOT need to remove any partitions prior to (and including) the Windows 8 C:-drive's partition. If you are unsure, revert what you did in item 1 above to enable booting Windows 8 again, restart Windows and get yourself aquainted with your disk's layout. Also see "My decisions" item 3 above for a comparison/help at that. When you know your way around in your partitions, go back here and start over at item 1 just above.
- On my system (see "My decisions" in item 3 above) I removed data volumes D: and G:, gaining 177GB of free disk space for OpenSUSE to use.
- Reboot and revert the BIOS settings you did in item 1 just above, in order to re-enable UEFI/GPT/Secure Boot.
- Do a new reboot, and check that W8 is still able to boot. It should work.
- Power off Windows 8
- <Wkey>-I --> Power --> "Shut down"
PART 5 Installation:
Setting up OpenSUSE 12.3 with UEFI and Secure boot:
This is actually quite simple: Follow the instructions documented by OpenSUSE. After selecting to install from OpenSUSEs DVD image that I had burned to a DVD, here is what I did:
- I tried to boot off the USB DVD, and lured the boot-menu to the front by holding down the <Esc>-key. It may be different on your computer.
- I got a boot menu, but my USB DVD drive was not among the alternatives. So, I thought I had to migrate the DVD onto a USB-memory stick. However, there was a "Asus UEFI boot"-alternative available. By selecting that, the USB DVD-drive started spinning, and the OpenSUSE 12.3 installation menu was displayed.
- I hit <enter> for "Installation" and waited until the Welcome-screen was displayed. There I made my choice of language and keyboard and clicked <next>.
- I arrived at the Installation Mode -screen. I selected New Installation and checked kept the prefilled check-boxes (unchecked: Include Add-on Products from Separate Media, checked: Use Automatic Configuration). <Next>.
- Clock and Time Zone-screen. I made choices relevant for me by selecting country/time zone on the map. I kept the "Hardware Clock Set to UTC"-check-box unchecked. <Next>
- Desktop Selection. KDE. <Next>
- Suggested Partitioning:
- As I already had 4 partitions left after removing 2 (sd1 through sda4), the first partition available for OpenSUSE would be named sd5. Here, OpenSUSE suggested a scheme that would make use of the free area on my HDD: A swap volume as sda5 (2GB), a root volume as sda6/ext4 (20GB) and a home partition as sda7/ext4 (155GB). The EFI-part was set to: "Set mount point of /dev/sda1 to /boot/efi". That is a perfectly OK, scheme, and I could have accepted that.
- However: I want to try out OpenSUSE as a laptop-OS. I've read somewhere that Linux hibernates to the swap volume (I haven't tested that yet, but I intend to). That means swap needs to be a little bigger than the amount of RAM. So, having (only) 4GB RAM, I allocated 4GiB + 128MiB swap volume (=4224MiB).
- I also want to start experimenting with compiling stuff - kernels included - which I have experienced on earlier attempts, that sometimes require more space than immediately meets the eye.
- Having a separate home volume partition to be prepared for future upgrades makes perfectly good sence.
- To make it easy, I split the remaining disk space in two equal halves: 86,7GB each for root (/) and /home partitions.
- Thus, I selected "Edit Partition Setup" to that effect and made my adjustments. After finishing my partition-selections, I clicked "Accept".
- Then the OpenSUSE installation told me "You chose to install onto an existing partition that will not be formatted. Yast cannot guarantee your installation will succeed, particularly in any of the following cases...". Well. I double checked, and checked again. I had set up all my three, new partitions to be formatted. So, knowing Yast wasn't correct (could it be that ie. the MSR partition triggering this? That one is not formatted.) I answered Yes to Yast's challenging question: "Really keep the partition unformatted?"
- Returning to "Suggested Partitioning screen" again
- I checked that the partition info did reflect my selections and adjustments. It did. <Next>
- Create New User screen: I filled in the vaues as appropriate for me. (I always make the root and user passwords different, and I never use automatic login). < Next>
- Finally, I got to the "Installation Settings" screen. Here's the important UEFI part.
- I found the "Booting options" portion: Open SUSE did detect the UEFI correct, and correctly selected the GRUB2-EFI option. However, just as the Open SUSE documentation says, it didn't detect Secure Boot. I need that.
- I clicked the "Booting" choice.
- Boot loader Settings screen. I checked the "Enable Secure Boot Support" check-box. <OK>
- Back to the Installation Settings screen again, and read that my secure-boot choice was accepted.
- I made my choices for the other options, according to what (I think) I need, and want to experiment with at first. This is no different from any Open SUSE installation, as far as I know. (To be honest, I wandered through the options in detailed layout, but this time I didn't change anything apart from what I have mentioned above! I'm planning to replicate the 12.3 repository to an external drive later, so I can do what I like later without even being online - summer holidays are closing in ...) <Install>
- After a while (30+ minutes), the installation finished, and the PC rebooted. I didn't remove the DVD disk (as I didn't receive any instructions about doing so).
- After booting (from the HDD), OpenSUSE had automatically pre-selected OpenSUSE for me (I did see Windows 8 there as well!), the installation process continued with automatic configuration - still accessing the DVD during that process. Soon, that came to an end, and I could log in to Open SUSE for the first time - on my HDD, UEFI - Secure Boot - Dual Boot with Windows 8 and all... SUCCESS!
Step 6 Closing adjustments
Adjusting Windows 8 after everything else has been done:
If you boot into Windows 8 after carrying out all the entries above – and start Windows Explorer (e.g. using <Wkey>-E), you will find that the newly created Linux volumes are visible and (almost) ready to be used from Windows 8. They even have their own drive letters, even though they are marked as RAW, and having “no content”! If you click on any one of these drives, Windows 8 will rush to your assistance and offer you to format them, in order to make them useful! We do not want that! These Linux volumes needs to be hidden from use in Windows. You can do that in two ways; through the GUI or command line:
- The GUI-method: Press <Wkey>-X and select Disk Management. For each of the (“RAW”) Linux volumes, right-click on it and select “Change Drive Letter”. In the resulting Dialog box, you select the “Remove”-button in order to remove the drive-letter assignment. Confirm that you understand the consequences of the warning being displayed. Click OK. This effectively hides the processed volumes from Windows 8's Explorer.
- The Command-line method: Press <Wkey>-X and select “Console – Administrator mode”. Confirm. Enter the following command: mountvol <drive> /D and press the <Enter>-key. <drive> is to be replaced with the drive letters shown for each of the Linux volumes we are to hide from Windows 8, so you need to execute the command once per Linux volume.
An afterthought: When using gdisk under OpenSUSE, I saw that the GUID code used for the Linux partitions I created was the code used for Windows Basic Disk. That being so, it is only natural that Windows 8 displays those partitions as a standard data disk, and offering them to the user. These GUID codes were automatically selected/decided by the OpenSUSE 12.3 partitioner during OpenSUSE installation. I haven't read the GPT specifications, so this may be very reasonable (it may even have to do with secure-boot having to use certificates signed by Microsoft), but – having 64 bits at disposal for classing devices – there should be possible to come up with e.g. a Linux Basic Disk and eliminating this last adjustment to Windows 8, and thereby better protect Linux volumes from Windows' ignorance of other file systems. If this effect is due to OpenSUSE using Microsoft certificates, I am sure that this will change in the future when secure-boot is no longer experimental.
Securing the boot-setup: Repeat the step executed in Step # 4, Preparing Windows 8 for dual booting, item 3, but use a different file name that you did then. You should not overwrite the old file. This will save the modified EFS partition complete with what OpenSUSE added for it (and GRUB2) to do its magic.
Step 7 Troubleshooting:
This is the part that I am least content with. I welcome any contributions here.
There are several fields where you can get problems. For the "I am able to boot, but have problems within Linux (or Windows)" type of problems – and that is not directly related to disk partions/volumes, they are no different than they ever were in either OS, and I have to point you to the normal support channels for the OS in question.
If you get problems with booting or dual-booting, then that is what I aim to cover here. However, so far there isn't many tools available for us to use. And most of the tools that do exist, are fairly technically oriented and not meant for the occasional user. I haven't had any problems yet, so I must guess a little at what kind of problems one can run into, and I lack experience with the tools that do exist, so I cannot offer much details either. I will, however, fill in advice I receive from you all, if you are so kind as to supply me with them.
- Nothing is booting any more. This is the worst scenario.
- You can try booting from the Windows 8 recovery stick created in part 4 above, interrupt the process and go to the command-line. We will restore the ESP partition data we saved in part 6, Securing the boot-setup. Execute "bcdedit /import <file>" where <file> is the name of the file you used in part 6 above.
- If 1.1. above fails, the ESP partition itself is probably destroyed. That can be fixed in several ways. The easiest is probably to recreate it (e.g. using PartEd Magic live-CD), then restore it using the procedure of a) above.
- If 1.1. succeeds, but still no boot, I would find me an emergency boot medium (PartEd Magic or the Windows 8 recovery stick), and process the partitions using some disk-analyzing tool. Since Windows is what Windows is, with Windows based tools (at least the original Microsoft tools) you run the risk that the tools will destroy the contents of Linux partition (remember – Windows sees them as unformatted Windows Basic Disk volumes). Linux based tools are therfore my clear favourite here, but I know of no such tools yet, that isn't data destructive too. Sorry. (<Help anyone?> )
- Only OpenSUSE will boot. Frankly, I think this is the least probable alternative.
- Look into what efibootmgr (included with OpenSUSE 12.3) can do for you. The link to OpenSUSE's EFI demystifier above, also provides an example of how to use efibootmgr. Try setting –bootnext and point it to Windows 8. If the problem is UEFI NVRAM only, that may rectify it.
- Is it only with secure-boot? OpenSUSE documentation says: "Secure boot may stop working in the future. If that happens, simply disable secure-boot – then commence OpenSUSE booting – and do an online upgrade. This will download a new version of shim that will work. After doing the maintenance, re-enable secure-boot and you are up to speed again."
- Only Windows 8 is booting – nothing to be seen of OpenSUSE: This is probably the more likely situation because we have to "tame" Windows 8 so it behaves itself in a dual-boot environment. This is probably an NVRAM issue, and can be remedied by using bcdedit and make it set OpenSUSE to "bootnext".
Tools of the trade: As I said, there are not much available, but there are some:
Windows based tools:
- Microsoft's bcdedit.exe. (Included in Windows 8) Command-line based. It seems to be able to do nearly whatever we would ever want to do with an ESP partition, but terribly documented. Hard to understand because of that.
- EasyBCD. (EasyBCD - NeoSmart Technologies) GUI based. Should be easy to use for what it can do, but has limited capability when compared to what the other tools have. Its community version is free for private and some non-profit use, but it is reported to silently insert commercial in other components. I haven't used it.
- Visual BCD (http://www.boyans.net/). Makes use of the Windows WMI interface. Promising. Easy to use, and potentially far more powerful than EasyBCD. Free for personal use. However, the site lacks dates in general, and the license dates suggests there have been no development since 2011. UEFI isn't fully implemented, but is claimed to work. I receive some errors when I tried using it but nothing wrong has been detected. The uninstaller doesn't properly clean up the registry. When saving off the ESP partition, it produces a file of the same size as bcdedit.exe, but their contents are different.
Linux based tools: There is, of course, efibootmgr, (included in OpenSUSE 12.3) and that is all I have on the list for now. I am sure there are more. Please help me compile a proper list. I'll return later myself and fill in more, but I thought it was better to publish this article now and not delay all the other stuff.
Also, if a data disk is the problem: Windows 8 cannot read a newly partitioned GPT disk. Linux can. It has NTFS file system. Did you create the MSR partition?
Step 8 YAHOO!!!! Working for me :)
First impressions:
Everything seems to work well, apart from two things:
- I have not been able to find a HW driver for my 100Mbit cable-ethernet card. Since WiFi worked straight off the bat and I have an old USB/ethernet card lying around for service purposes that Linux do provide drivers for, I probably will not bother with it.
- The touchpad is misinterpreted and I cannot adjust it – not even in the fields displayed as being editable. I have a clickpad (not two separate buttons separated from the touchpad). However, I am able to use it in ways that shouldn't be possible if I understand the touchpad setup-windows correctly. Obviously, I am missing something. Oh well. I have to dig into that later.
The touch screen could be used to move Windows around when I was using the PartedMagic live-CD, but nothing else. In OpenSUSE, however, I can mark areas and click, drag and move objects as I wish, using the touch screen. However, since the GUI is still mouse/keyboard-oriented (and added to that, I currently have the LapTop scheme active), fields are pretty narrow for my fingers when using the touch-screen for it to be productive.
However, much to my surprise, I see myself mixing the use of keyboard, touchpad and touch-screen (and mouse, when I have one connected) when interacting with the computer. I never thought it would be that tempting (and natural) to use the touch screen in that way. I thought the ergonomics of that would be terrible. It isn't. (At least not on a laptop computer, where I keep the screen considerably lower and closer to my body than when I use stationary monitors on table tops). You just get another method for interaction, and you use it as you see fit. My guess is that some will like it, and some will not.
Well. That was it. I hope someone will find some of it useful. Please feel free to comment and correct! Bye, now!