Monday, April 30, 2012

Installing MySQL on Linux (centOS)


Following are steps to install MySQL on CenOS 5/6.

  1. Check the OS Versions and download respective installables from Oracle / Mysql Sites.
    1. cat /proc/version
    2. cat /etc/issue
    3. cat /etc/redhat-release
    4. lsb_release -a
  2. For my CentOS system download following to your Linux System:
    Output of $ lsb_release -a
    1. MySQL Cluster 7.3.4 RPM for Oracle Linux / RHEL 6 x86 (64bit) V43767-01 330M
    2. MySQL Cluster Manager 1.3.0+Cluster RPM for Oracle Linux/RHEL 5+6 x86 (64bit) V42979-01 140M
    3. or download: MySQL-Cluster-gpl-7.3.5-1.rhel5.x86_64.rpm-bundle.tar
  3. Important RPM Command for Installing RPM Package.
    1. Install: $ rpm -ivh mcm-1.3.0-cluster-7.3.3-linux-rhel5-x86-64bit.rpm
      1. -i : install a package
      2. -v : verbose for a nicer display
      3. -h : print hash mark as the package archive is unpacked.
    2. Check Signature: $ rpm --checksig mcm-1.3.0-cluster-7.3.3-linux-rhel5-x86-64bit.rpm
    3. Check dependency of rpm package before installing:[rpm -qPR *.rpm]
      1. -q: query a package
      2. -p: list capabilities this package provides
      3. -R: list capabilities on which this package depends
    4. Install a RPM package without dependencies: [rpm -ivh --nodeps *.rpm]
    5. Check an install rpm package: rpm -q mysql
    6. List (query list) all files of an installed rpm package: [ $ rpm -ql mysql]
    7. List recently installed rpm packages: [$ rpm -qa --last]
    8. List all installed rpm packages: [$ rpm -qa]
    9. Upgrade a rpm package: [rpm -Uvh *.rpm]
    10. Remove a package: [$ rpm -evv mysql]
    11. Remove a rpm package without dependencies: [$ rpm -ev --nodeps mysql]
    12. Query a file that belongs which rpm package: [$ rpm -qf /usr/bin/htpasswd]
    13. Query an info for installed rpm package: [ $ rpm -qi mysql]
    14. Get info of rpm package before installing: [ $ rpm -qip *mysql*.rpm] # query info package
    15. Query documentation of installed RPM Package: [ $ rpm -qdf /usr/bin/vmstat] (query document file)
    16. Verify a RPM package: (verify package) $ rpm -vP *mysql*.rpm
    17. Verify all RPM package: rpm -Va
    18. Import RPM GPG Key: $ rpm --import /etc/pki/rpm-gpg/RPM-GPG-KEY-CENTOS-6
    19. List all imported RPM GPG Key: ( $ rpm -qa gpg-pubkey*)
    20. Rebuild corrupted RPM database: Sometimes rpm database gets corrupted and stops all the functionality of RPM and other applications on the system, so at that time we need to rebuild the RPM Database and restore it with the help of following commands:
      1. cd /var/lib
      2. rm __db*
      3. rpm --rebuilddb
      4. rpmdb_verify Packages
  4. Installation Steps:
    1. Create required users / group on CentOS & unarchive file on all hosts:
      1. $ groupadd mysql
      2. $ useradd –g mysql mysql
      3. Artifacts.
        1. tar –zxvf  /usr/local/ mysql-cluster-gpl-7.3.2-linux-glibc2.5-x86_64.tar.gz or
        2. tar -zvf /usr/local/ MySQL-Cluster-gpl-7.3.5-1.rhel5.x86_64.rpm-bundle.tar [ wget http://cdn.mysql.com/Downloads/MySQL-Cluster-7.3/MySQL-Cluster-gpl-7.3.5-1.rhel5.x86_64.rpm-bundle.tar to download file]
      4. mv /usr/local/ mysql-cluster-gpl-7.3.2-linux-glibc2.5-x86_64 /opt/mysql_cluster
      5. chown mysql.mysql –R /opt/mysql_cluster
    2. We have list of following Servers:
      1. 10.253.92.154 - ndb(192.168.1.196) & mgm (192.168.1.144)
      2. 10.253.92.155 - ndb(192.168.1.197)
      3. 10.252.168.174 - mysql (192.168.1.152)
      4. 10.252.168.173 - mysql (192.168.1.193)
    3. On Server '10.253.92.154' & '10.253.92.155' create a new folder - Data Node.
      1. mkdir  /opt/mysql_cluster/ndbdata
      2. chown mysql.mysql –R /opt/mysql_cluster
    4.  MGM Node: (10.253.92.154) configuration:
      1.  cd /opt/mysql_cluster/ 
      2. vi config.ini
    5. Install and configure mysql on two mysqld node (10.252.168.173, 10.252.168.174)
      1. cd /opt/mysql_cluster/
      2. scripts/mysql_cluster_install --user=mysql --datadir=/opt/mysql_cluster/data --basedir=/opt/mysql_cluster/
      3. mv /opt/mysql_cluster/my.cnf /etc/my.cnf
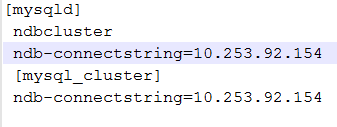
      4. vi /etc/my.cnf 
      5. Modify the /opt/mysql_cluster/support-files/mysql.server, replace datadir and basedir
        1. datadir=/opt/mysql_cluster/data
        2. basedir=/opt/mysql_cluster/
    6. Start all cluster and mgm node:
      1. Startup data node(10.253.92.154, 10.253.92.155)
      2. [root@Node1]# /opt/mysql_cluster/bin/ndbd --defaults-file=/opt/mysql_cluster/my.cnf --initial
      3. 2013-10-02 13:17:36 [ndbd] INFO     -- Angel connected to '10.253.92.154:1186'
      4. 2013-10-02 13:17:36 [ndbd] INFO     -- Angel allocated nodeid: 11
      5. Startup mysqld node(10.252.168.173, 10.252.168.174)
      6. Startup the mgm node:
        1. /opt/mysql_cluster/bin/ndb_mgmd -f /opt/mysql_cluster/config.ini --configdir=/opt/mysql_cluster
    7. Check status:

Sunday, April 29, 2012

Installing MySQL (noinstall Zip file) on Windows 7 (64)

Users who are installing from the noinstall package can use the instructions in this section to manually install MySQL. The process for installing MySQL from a Zip archive is as follows:
  1. Extract the archive to the desired install directory: Traditionally MySQL server is installed in C:\mysql and MySQL installation Wizard installs MySQL under C:\Program Files\MySQL, if we do not install MySQL at C:\mysql, we must specify the part to the install directory during startup or in an option file.
  2. Create an option file: If we need to specify startup options when we run the server, we can indicate them on command line or place them in an option file.
    1. The installation or data directory locations are different from the default locations (C:\Program Files\MySQL\MySQL Server 5.5 and C:\Program Files\MySQL\MySQL Server 5.5\data)
    2. We need to tune the server settings, such as memory , cache or InnoDB configuration information.
    3. When MySQL Server starts on Windows, it looks for option files in several locations, such as:
      1. Locations:
        1. Windows Directory [C:\> echo %WINDIR%]
        2. C:\
        3. MySQL Installation Directory.
      2. MySQL looks for options first in (my.ini) file then in (my.cnf) file each location, we can use both files but to avoid confusion better to use one file, as follows:
        1. %PROGRAMDATA%\MySQL\MySQL Server 5.5\my.ini,%PROGRAMDATA%\MySQL\MySQL Server 5.5\my.cnf
        2. %WINDIR%\my.ini, %WINDIR%\my.cnf
        3. C:\my.ini, C:\my.cnf
        4. INSTALLDIR\my.ini, INSTALLDIR\my.cnf
        5. defaults-extra-file The file specified with --defaults-extra-file=path, if any
      3. Use a --datadir option to specify the new data directory location each time you start the server.
  3. Choose a MySQL server type:
    1. SHOW [STORAGE] ENGINES: displays status information about the server's storage engines, same information can also be obtained from INFORMATION_SCHEMA_ENGINES tables.
  4. Starting the Server for the First Time:
    1. Clients have two options. They can use TCP/IP, or they can use a named pipe if the server supports named-pipe connections.
    2. MySQL for Windows also supports shared-memory connections if the server is started with the --shared-memory option. Clients can connect through shared memory by using the --protocol=MEMORY option.
    3. START: C:\> "C:\CCC\mysql\mysql-advanced-5.6.16-winx64\bin\mysqld" --console
      1. C:\CCC\mysql\mysql-advanced-5.6.16-winx64\bin>mysqld.exe --console --explicit_defaults_for_timestamp
      2. If you omit the --console option, the server writes diagnostic output to the error log in the data directory by default. The error log is the file with the .err extension, or may be specified by passing in the --log-error option.
    4. STOP: C:\> "C:\CCC\mysql\mysql-advanced-5.6.16-winx64\bin\mysqladmin" -u root shutdown
      1. If the MySQL root user account has a password, you need to invoke mysqladmin with the -p option and supply the password when prompted.
      2. The last option is to start mysqld with the --standalone and --debug options. In this case, mysqld writes a log file C:\mysqld.trace that should contain the reason why mysqld doesn't start.
    5. Use mysqld --verbose --help to display all the options that mysqld supports.
  5. Secure the default user accounts.
  6. Customize the Path for MySQL Tools: To make it easier to invoke MySQL programs, you can add the path name of the MySQL bin directory to your Windows system PATH environment variable:
    1. On the Windows desktop, right-click the My Computer icon, and select Properties.
    2. Next select the Advanced tab from the System Properties menu that appears, and click the Environment Variables button.
    3. Under System Variables, select Path, and then click the Edit button. The Edit System Variable dialogue should appear.
    4. Add Mysql/bin to PATH environment variables.
  7. Starting MySQL as Windows Service: A MySQL server installed as a service can also be controlled from the command line using NET commands, or with the graphical Services utility. Generally, to install MySQL as a Windows service you should be logged in using an account that has administrator rights.
    1. The Services utility (the Windows Service Control Manager) can be found in the Windows Control Panel (under Administrative Tools on Windows 2000, XP, Vista, and Server 2003). To avoid conflicts, it is advisable to close the Services utility while performing server installation or removal operations from the command line.
    2. Before installing MySQL as a Windows service, you should first stop the current server if it is running by using the following command:
      1. C:\> "C:\CCC\mysql\mysql-advanced-5.6.16-winx64\bin\mysqladmin" -u root shutdown.
      2. Note: If the MySQL root user account has a password, you need to invoke mysqladmin with the -p option and supply the password when prompted.
    3. Install the server as a service using this command:
      1. C:\> "C:\Program Files\MySQL\MySQL Server 5.5\bin\mysqld" --install
      2. set mysql/bin to windows PATH
        1. On the Windows desktop, right-click the My Computer icon, and select Properties.
        2. Next select the Advanced tab from the System Properties menu that appears, and click the Environment Variables button.
        3. Under System Variables, select Path, and then click the Edit button. The Edit System Variable dialogue should appear.
        4. IMP NOTE: You should not add the MySQL bin directory to your Windows PATH if you are running multiple MySQL servers on the same machine.
      3. The following additional arguments can be used when installing the service:
        1. You can specify a service name immediately following the --install option. The default service name is MySQL.
        2. If a service name is given, it can be followed by a single option. By convention, this should be --defaults-file=file_name to specify the name of an option file from which the server should read options when it starts.
        3. The use of a single option other than --defaults-file is possible but discouraged. --defaults-file is more flexible because it enables you to specify multiple startup options for the server by placing them in the named option file.
        4. You can also specify a --local-service option following the service name. This causes the server to run using the LocalService Windows account that has limited system privileges. This account is available only for Windows XP or newer. If both --defaults-file and --local-service are given following the service name, they can be in any order.
        5. For a MySQL server that is installed as a Windows service, the following rules determine the service name and option files that the server uses:
          1. If the service-installation command specifies no service name or the default service name (MySQL) following the --install option, the server uses the a service name of MySQL and reads options from the [mysqld] group in the standard option files.
          2. If the service-installation command specifies a service name other than MySQL following the --install option, the server uses that service name. It reads options from the [mysqld] group and the group that has the same name as the service in the standard option files. This enables you to use the [mysqld] group for options that should be used by all MySQL services, and an option group with the service name for use by the server installed with that service name.
          3. If the service-installation command specifies a --defaults-file option after the service name, the server reads options the same way as described in the previous item, except that it reads options only from the the named file and ignores the standard option files.
        6. C:\> "C:\CCC\mysql\mysql-advanced-5.6.16-winx64\bin\mysqld" --install MySQL --defaults-file=C:\my-opts.cnf
      4. Once a MySQL server has been installed as a service, Windows starts the service automatically whenever Windows starts, The service also can be started immediately from the Services utility, or by using:
        1. NET START MySQL command
        2. NET STOP MySQL
        3. You also have the choice of installing the server as a manual service if you do not wish for the service to be started automatically during the boot process. To do this, use the --install-manual option rather than the --install option:
          1. C:\> "C:\CCC\mysql\mysql-advanced-5.6.16-winx64\bin\mysqld" --install-manual
        4. Removing the service: To remove a server that is installed as a service, first stop it if it is running by executing NET STOP MySQL. Then use the --remove option to remove it:
          1. C:\> "C:\CCC\mysql\mysql-advanced-5.6.16-winx64\bin\mysqld" --remove
  8. Testing MySQL Installation: You can test whether the MySQL server is working by executing any of the following commands:
    1. C:\> "C:\CCC\mysql\mysql-advanced-5.6.16-winx64\bin\mysqlshow"
    2. C:\> "C:\CCC\mysql\mysql-advanced-5.6.16-winx64\bin\mysqlshow" -u root mysql
    3. C:\> "C:\CCC\mysql\mysql-advanced-5.6.16-winx64\bin\mysqladmin" version status proc
    4. C:\> "C:\CCC\mysql\mysql-advanced-5.6.16-winx64\bin\mysql" test
  9. Windows Useful Commands:
    1. Service Control: SC COMMAND ( SC [\\server] [command] [service_name] [Options] )
      1. server       : The machine where the service is running.
      2. service_name : The KeyName of the service, this is often but not always the same as the DisplayName shown in Control Panel, Services. You can get the KeyName by running: SC GetKeyName <DisplayName>
      3. commands:
        1. query  [qryOpt]   Show status
        2. queryEx [qryOpt]  Show extended info - pid, flags
        3. GetDisplayName    Show the DisplayName
        4. GetKeyName        Show the ServiceKeyName
        5. EnumDepend        Show Dependencies
        6. qc                Show config - dependencies, full path etc
        7. start          START a service.
        8. stop           STOP a service
        9. pause          PAUSE a service.
        10. continue       CONTINUE a service.
        11. create         Create a service. (add it to the registry)
        12. config         permanently change the service configuration
        13. delete         Delete a service (from the registry)
        14. control        Send a control to a service
        15. interrogate    Send an INTERROGATE control request to a service
        16. Qdescription   Query the description of a service
        17. description    Change the description of a service
        18. Qfailure       Query the actions taken by a service upon failure
        19. failure        Change the actions taken by a service upon failure
        20. sdShow         Display a service's security descriptor using SDDL
        21. SdSet          Sets a service's security descriptor using SDDL
      4. qryOpt:
        1. type= driver|service|all - Query specific types of service
        2. state= active|inactive|all - Query services in a particular state only
        3. bufsize= bytes 
        4. ri= resume_index_number (default=0)
        5. group= groupname - Query services in a particular group
      5. Misc commands that don’t require a service name:
        1. SC  QueryLock  Query the LockStatus for the ServiceManager Database. this will show if a service request is running
        2. SC  Lock       Lock the Service Database
        3. SC  BOOT       Values are {ok | bad} Indicates whether to save the last restart configuration as the `last-known-good` restart configuration
      6. Options:
        1. The CREATE and CONFIG commands allow additional options to be set see the build-in help: 'SC create' and 'SC config'
    2. Windows check who is using a particular port:
      1. C:\> netstat -aon | find /i "listening" | find "3306"
      2. C:\> netstat -abno


Wednesday, April 4, 2012

Adding Classes to the JAR File's Classpath

You may need to reference classes in other JAR files from within a JAR file.
For example, in a typical situation an applet is bundled in a JAR file whose manifest references a different JAR file (or several different JAR files) that serves as utilities for the purposes of that applet.
You specify classes to include in the Class-Path header field in the manifest file of an applet or application. The Class-Path header takes the following form:
Class-Path: jar1-name jar2-name directory-name/jar3-name
By using the Class-Path header in the manifest, you can avoid having to specify a long -classpath flag when invoking Java to run the your application.

Note: The Class-Path header points to classes or JAR files on the local network, not JAR files within the JAR file or classes accessible over internet protocols. To load classes in JAR files within a JAR file into the class path, you must write custom code to load those classes. For example, if MyJar.jar contains another JAR file called MyUtils.jar, you cannot use the Class-Path header in MyJar.jar's manifest to load classes in MyUtils.jar into the class path.

An Example

We want to load classes in MyUtils.jar into the class path for use in MyJar.jar. These two JAR files are in the same directory.
We first create a text file named Manifest.txt with the following contents:
Class-Path: MyUtils.jar

Warning: The text file must end with a new line or carriage return. The last line will not be parsed properly if it does not end with a new line or carriage return.

We then create a JAR file named MyJar.jar by entering the following command:
jar cfm MyJar.jar Manifest.txt MyPackage/*.class
This creates the JAR file with a manifest with the following contents:
Manifest-Version: 1.0
Class-Path: MyUtils.jar
Created-By: 1.7.0_06 (Oracle Corporation)
The classes in MyUtils.jar are now loaded into the class path when you run MyJar.jar.