Use PuTTYgen to generate a private/public key on the SSH client PC:
The example installation is from an installation on a Windows Vista Ultimate laptop PC
In the following procedure a 4096-bit RSA private/public key pair will be generated on the SSH clients PC. The public key will be transferred to the copSSH server PC for installation by the copSSH server administrator in the users .ssh folder.
Important Perquisites
Make sure the user is activated on the copSSH server prior to performing this procedure.
Make sure the user can login to the copSSH server PC using PuTTY and/or WinSCP with a password.
Create a new private/public key pair encrypted with a strong pass phrase using PuTTYgen
PuTTYgen is automatically installed on the client PC when WinSCP is installed or it can be downloaded from the PuTTY site. On the client PC go to Start | Run and run the C:\Program Files\WinSCP\PuTTYgen\puttygen.exe program from the command line.
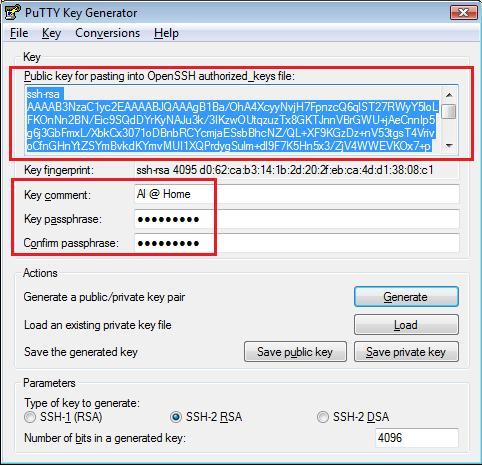
Select SSH-2 RSA and 4096 bits. Click on the Generate key.

Image 1
Enter an appropriate/descriptive Key comment, enter a strong pass phrase in the Key passphrase window then reenter the pass phrase in the Confirm the passphrase window.
Good pass phrases are 10-30 characters long, are not simple sentences or otherwise easily guessable (English prose has only 1-2 bits of entropy per character, and provides very bad pass phrases), and contain a mix of upper and lowercase letters, numbers, and non-alphanumeric characters.
Do NOT forget the pass phrase. Lost pass phrases can NOT BE RECOVERED.
Highlight and copy the text in the Public key for pasting into OpenSSH authorized_keys file window into a Notepad text file. Name the file with a descriptive file name with a .pub extension and save on the client PC in a temporary folder. For example the user Al might save his public key file as Al.pub in the client C:\Temp folder.

Image 2:
Click on the Save private key button to convert and save the private key in the C:\Program Files\WinSCP\PuTTY\Key Files folder on the client PC. Create the folder if needed.

Image 3:
Move the public key to the copSSH server PC
In order to use a private/public key pair the newly created public key must be moved to the copSSH server PC. Use whatever means required to accomplish this, ie. floppy, flash drive, etc. The copSSH server administrator will then copy the new public key to the users C:\Program Files\copssh\home\\.ssh\authorized_keys file . For example the copSSH server administrator might copy the Al.pub file to the C:\Program Files\copssh\home\Al\.ssh\authorized_keys file on the server PC.
Configure PuTTY and/or WinSCP on the client PC to use the private key file
Open PuTTY and load a previously saved session, or create a new session. Enter the path and file name of the private key file in the Private key file window. I also recommend configuring PuTTY to only use the SSH2 Protocol. Click on SSH and select 2 only as the Preferred SSH protocol version. Continue configuring PuTTY including an alternate Port number for the SSH server (if used) as desired then save the session.

Image 4:
Open WinSCP and load a previously saved session, or create a new session. Enter the path and file name of the private key file in the Private key file window. I also recommend configuring WinSCP to only use the SSH2 Protocol. Click on SSH and select 2 only in the Protocol options window. Continue configuring WinSCP including an alternate Port number for the SSH server (if used) as desired then click on Save.

Image 5
The example installation is from an installation on a Windows Vista Ultimate laptop PC
In the following procedure a 4096-bit RSA private/public key pair will be generated on the SSH clients PC. The public key will be transferred to the copSSH server PC for installation by the copSSH server administrator in the users .ssh folder.
Important Perquisites
Make sure the user is activated on the copSSH server prior to performing this procedure.
Make sure the user can login to the copSSH server PC using PuTTY and/or WinSCP with a password.
Create a new private/public key pair encrypted with a strong pass phrase using PuTTYgen
PuTTYgen is automatically installed on the client PC when WinSCP is installed or it can be downloaded from the PuTTY site. On the client PC go to Start | Run and run the C:\Program Files\WinSCP\PuTTYgen\puttygen.exe program from the command line.
Select SSH-2 RSA and 4096 bits. Click on the Generate key.

Enter an appropriate/descriptive Key comment, enter a strong pass phrase in the Key passphrase window then reenter the pass phrase in the Confirm the passphrase window.
Good pass phrases are 10-30 characters long, are not simple sentences or otherwise easily guessable (English prose has only 1-2 bits of entropy per character, and provides very bad pass phrases), and contain a mix of upper and lowercase letters, numbers, and non-alphanumeric characters.
Do NOT forget the pass phrase. Lost pass phrases can NOT BE RECOVERED.
Highlight and copy the text in the Public key for pasting into OpenSSH authorized_keys file window into a Notepad text file. Name the file with a descriptive file name with a .pub extension and save on the client PC in a temporary folder. For example the user Al might save his public key file as Al.pub in the client C:\Temp folder.
Click on the Save private key button to convert and save the private key in the C:\Program Files\WinSCP\PuTTY\Key Files folder on the client PC. Create the folder if needed.

Move the public key to the copSSH server PC
In order to use a private/public key pair the newly created public key must be moved to the copSSH server PC. Use whatever means required to accomplish this, ie. floppy, flash drive, etc. The copSSH server administrator will then copy the new public key to the users C:\Program Files\copssh\home\
Configure PuTTY and/or WinSCP on the client PC to use the private key file
Open PuTTY and load a previously saved session, or create a new session. Enter the path and file name of the private key file in the Private key file window. I also recommend configuring PuTTY to only use the SSH2 Protocol. Click on SSH and select 2 only as the Preferred SSH protocol version. Continue configuring PuTTY including an alternate Port number for the SSH server (if used) as desired then save the session.

Image 4:
Open WinSCP and load a previously saved session, or create a new session. Enter the path and file name of the private key file in the Private key file window. I also recommend configuring WinSCP to only use the SSH2 Protocol. Click on SSH and select 2 only in the Protocol options window. Continue configuring WinSCP including an alternate Port number for the SSH server (if used) as desired then click on Save.
